Originally posted to Real Simple.com

Not all eco-friendly products are created equal. Some seemingly green options aren’t actually worth the extra money.

Biodegradable Products

Unless you have your own compost pile, or live in a place where there is municipal composting, products marketed as biodegradable won’t actually biodegrade. In order to break down, a biodegradable item needs air, water, light, microbes, and enzymes. And those conditions aren’t readily available in overstuffed landfills. The better choice: reusable materials.

English: Materials in a compost bin.

English: Materials in a compost bin. (Photo credit: Wikipedia)

Natural or Organic Cosmetics

If you see the words, organic, natural, or eco-friendly on a bottle of cream, shampoo, or face powder, keep reading. Unless you notice a stamp from a reliable third party certifier to back up these green claims, it might not be as organic as you think. There might only be a single certified organic oil mixed in with 20 other decidedly non-organic ingredients. Look for items that are USDA certified organic, or that carry a Natural Products Association seal, or a BDIH stamp. You can also check out the safety of any cosmetic before purchasing on the Good Guide or The Environmental Working Group’s Skin Deep database.

Antibiotic and Hormone­–Free Meat

It’s a great choice to avoid eating meat that contains either, but without third party certification, you never know what you’re really biting into. Look for the USDA organic seal, which bans the use of both and requires third party certification.

Read more about why you should buy antibiotic- and hormone-free meat at practicallygreen.com.

BPA-Free Plastic

Bisphenol-A (BPA) is an industrial chemical involved in making certain plastics and has been associated with potential health hazards. However, BPA-free claims are also very difficult to verify and a recent study showed that most plastics, not just BPA, are harmful, especially when exposed to heat. If you are concerned about chemicals leaching from plastics into your food, the safest option is to switch to glass or lead-free ceramics for heating or dishwashing.

Reusable Bags

Sometimes there is too much of a good thing. Of course reusable bags are preferable to plastic or paper, but they do require a lot of energy to produce. According to a British government-sponsored life cycle assessment, a cotton bag must be used 171 times before it’s environmentally friendlier than paper or plastic. So the next time you forget your reusable bags, don’t guilt yourself into buying more, rather reuse the paper or plastic you take.

Organic Dry–­­Cleaning

A large percentage of U.S. dry cleaners use perchlorethylene (aka perc), which the EPA says causes cancer in lab animals, and is a possible carcinogen. However, some of the chemicals most so-called organic cleaners use aren’t proven to be tremendously safer than perc. If you can find a CO2 or wet cleaner, that’s much better. Or wash your clothing yourself; it’s amazing how most items labeled dry clean only do just fine in a cold water cycle.

Eco-Friendly Fabrics

Organic cotton is an excellent green choice. The EPA considers seven of the top 15 pesticides used on cotton crops to be possible, likely, probable, or known carcinogens. Unfortunately, too many items, including sheets and towels, are labeled organic or eco-friendlywith no certification to back it up. Look for the USDA organic seal or Global Organic Textile (GOTS) certification.

Labeling for products that meet the USDA-NOP s...

Labeling for products that meet the USDA-NOP standards (Photo credit: Wikipedia)

Enhanced by Zemanta

We love cruising the web and finding different places for different and fun DIY projects for you to embark on!

Here are a few of our favorites from the week:

Easily Recreating The Look of a Classic Wallpaper: Patterned Paint Rollers

From Fresh Home Design & Architecture


Jar and Holder Labels for your goods

From homepindesigns.com


Acorn Fall DIY Projects

From Mrkate.com


Solid Wood Shelves

From design-decor-staging.com

And just before the good weather comes to an end…

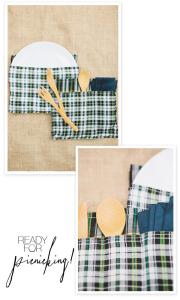
DIY Picnic Baskets

From stylemepretty.com

Re-blogged from BathFitter.com:

Fear not, owners of small bathrooms! Bathroom renovation for the cozy and compact doesn’t have to be a burden. In fact, it can even be fun and exciting, especially if you utilize this guide to making small bathroom renovation easy. You’ll find suggestions geared specifically toward small spaces, as well as tips that can create the impression of more space and open up your bathroom.

Wainscoting Is for All Size Bathrooms

Wainscoting is an easy process that knows no limits, big or small, when it comes to the size of your bathroom. It is an aesthetic transformation that adds texture to any part of the wall that you choose. There are plenty of options, and it can be a DIY procedure if that’s easiest for you.

A Conversion Is the Pathway to Freedom

An easy way to add space to your small bathroom is to perform a tub-to-shower conversion. This allows you the freedom to dictate how big or small your shower will be, since you are not hampered by the tub and the need for space to bathe. In addition, a shower allows for other options that will open up space in your bathroom, covered in detail below.

Shower Doors Should Open Up…The Room

If you’re upgrading to a shower door or getting rid of your old one, think about how you want it to open. Sliding doors don’t need any clearance. If you’re opting for a hinged door, think about making it as small as possible and make sure it opens up in a way that won’t be interfering with anything else in your bathroom.

Clear Glass = More Space

Frameless & clear glass shower doors can give the appearance of more space because they will eliminate visual barriers from the room. You may also want to make sure your shower walls are up to snuff with a new shower surround renovation, since they will now be exposed to the entire room.

Small Bathroom

Let There Be Light

Opt for lighter colors and more solid patterns. Lighter colors and subtle tones will open up the room, and solid patterns will help create the illusion of more space. Keep this in mind when making design decisions for any aspect of your bathroom: shower surround, wainscoting, wall paint, furniture, etc..

Accessorize the Shower

Accessorizing your shower can allow you to add a design element to your existing space while simultaneously creating more storage within your shower. Maybe it’s time to move certain things from the linen closet to a towel bar or a corner shelf. Even replacing your faucets and fixtures for more simple ones can give the impression of more space. If you have a clear glass shower door, these shower accessories become part of the overall look of your bathroom.

Go Vertical

Go Vertical, whatever that might mean for your bathroom. Utilize the space from the floor to the ceiling. Put a shelf somewhere new. Condense your tub area to a more vertically-oriented shower. Put a storage bin on top of something, even if it’s tough to reach. Before you know it, you’ll have more space and you’ll be wondering why you didn’t think of going vertical on your own.

These are just a few ways in which renovating a small bathroom can stop being a nuisance and start becoming fun. Good luck in your project, and as always, your friends at BATH FITTER are a phone call away to assist you with anything you might need.

Enhanced by Zemanta

*this post was originally posted to RealSimple 

By Roopika Malhotra

Minimize mess, maximize storage: Create a cool, calm space where you’ll feel collected.


Toss Your Tired Products

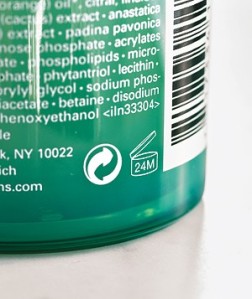
Even ruthless purgers tend to hold on to lotions and potions for too long. But all items become less effective over time. Throw out anything that smells or looks funny or that you know is well past its prime. Many products have a “period after opening” label, a number followed by the letter M (shown). It indicates how many months the item is effective after opening. In general eye makeup is good for six months, foundation a year, and lipsticks two (but pay attention to preservative-free products, which typically degrade more quickly than others).

Use a Sticker Strategy

For an easy way to track how long you’ve had a product, write the month and year when you first open it on a small sticker or a piece of masking tape and affix it to the bottom of the jar or tube. In time, if the item starts looking dicey, you can refer to this date to see if you’re in the clear or not. Then you can get back to remembering more important dates, like your mother’s birthday.

Channel a Surgeon

Most mornings, you need to fly out of the bathroom, so having everything readily available is key. Instead of rummaging through a dopp kit for your daily makeup, arrange everything on a small tray atop a counter. This way, you’ll have all your trusty implements at hand, just like a doctor. (And when you’re not using those items, stow the tray in a drawer.) Separate all other cosmetics by category (lip colors, shadows, blushes, etc.) and store them in containers that fit in the drawer. This will help you to see all your options at a glance―and encourage you to use them. Whether you repurpose pretty tins or purchase new boxes, they should be shallow enough so you can rest the daily-makeup tray on them and still shut the drawer.

Show the Disposables

So you can see when supplies are dwindling and know when it’s time to stock up, put everyday essentials, including cotton balls and swabs, in clear containers. Consider using any repurposed vessels or glass apothecary jars. Keep makeup brushes upright and accessible in a tumbler (as opposed to dusting up your drawers or makeup bag).

Don’t Hide the T.P.

Two conundrums you’ve probably experienced: (1) You’re in your bathroom and you realize you are out of toilet paper. (2) You’re in someone else’s bathroom and you realize they are out of toilet paper. (Do you uncomfortably search your host’s cupboards or sheepishly go interrupt her?) Skip scenario one at least and always keep ample rolls in a nearby urn, bin, or basket (check Pottery Barn, Ikea, and Target for good basket options). As for scenario number two, with luck your friends will also read this.

Keep Some Supplies to Yourself

Daily skin-care essentials are best stored in the medicine cabinet for easy access at the sink and mirror. Stow the items you use only on an as-needed basis―summer sunblock, tampons, guest soaps―in a closet or a closed cabinet. To save money and cut down on waste and trips to the store, buy shampoo, conditioner, and body wash in bulk and store them here. Decant the products into smaller bottles for the shower and even tinier ones for traveling. (You can find small containers at drugstores and websites like organize.com.)

Consider the Ceiling

If your quarters are tight and space is already compromised, look up. Take advantage of vertical real estate by hanging a multilevel fruit basket for additional storage. When placed in the shower, the open rungs of the three-tier hanging basket allow loofahs and bath toys to dry over the tub. Or suspend the basket in an unused corner and stock it with lotions, treatments, and scented sachets (in lieu of dust-catching potpourri).

Create a Caddy

Hair dryers, curling irons, brushes, and styling products can become an unruly mess to manage. To keep yours neat, store them in a tote bag with many compartments, like the Personal Shower Tote (shown; $10,kangaroomstorage.com). Hang the handle over a doorknob when you’re doing your hair, then store the kit and caboodle under a sink or in a closet when you’re done. Wrap the cords of your curling iron and blow dryer loosely, like lassos, to maintain their life.

Take Cover

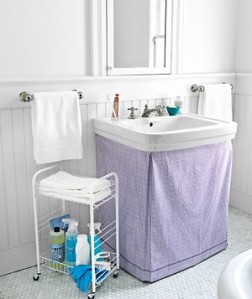
If you have a pedestal sink that’s not pretty enough to be, well, put on a pedestal, make a no-sew fabric skirt. (For easy instructions, see below.) Along with adding some grace to your space, you’ll create more coveted hidden storage. The best thing to keep under there is an organizing unit on wheels, like this three-tier cart ($18, stacksandstacks.com). Roll it out from under the sink to reach extra hand towels and cleaning supplies, then roll it back into hiding when you’re finished.


*this blog was originally posted to RealSimple

By Jennifer Jafarzadeh

Once you’ve prepped the walls, the actual painting is easy.

Step 1

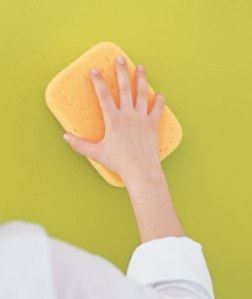
Clean walls.
Remove dust, dirt, and grease spots (which can ruin a smooth finish) with water, a little mild dishwashing detergent, and a cellulose sponge. Rinse walls with clean water to remove the soap residue.

Step 2

Tape the trim, window, and doorframes
Be sure to use painter’s blue tape, which can be applied up to a week ahead. Remove tape immediately after painting, before the wall dries, so you don’t peel off any paint with it.

Step 3

Prime the walls.
It’s a common myth that walls that have been painted many times don’t need to be primed. In fact, primer helps maximize the sheen and coverage of paint and gives the finish coat a more uniform appearance.

Step 4

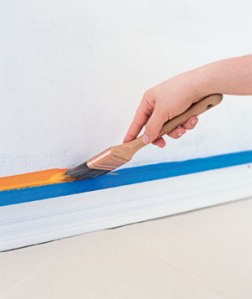
Brush where you can’t roll.
Brush on paint around trim and in the corners of walls, where your roller can’t reach, with a two-inch angled brush. Extend out two to three inches from windows, doors, and moldings.

Step 5

Use the W technique.
For efficiency, start in the corner of a wall and roll on a three-by-three-foot W pattern, then fill it in without lifting the roller. Continue in sections until you’re finished. Paint one wall at a time.

Step 6

Paint the trim.
When the walls are completely dry, tape where the trim meets the wall. Paint the moldings and the door and window frames with a two-inch angled brush.

..is another man’s treasure. Truer words have never been spoken.

The most definitive example of this statement is the age old trend of garage sales. I remember it like it was yesterday; waking up a 4:30 on a SATURDAY with my mom, route in hand, a clean car, wads of cash, and bargain faces on.

There’s no doubt some of the best bargains can be found at yard sales. Items with color, personality, that you won’t find anywhere else are just waiting for you to throw a few dollars down, load up, and give a new shot of life to.

Garage Sale

Garage Sale (Photo credit: besighyawn)

But it is definitely an endeavor. After years of doing it alongside my favorite partner, mom, I have some tips to share with everyone that will help them make the most of treasure hunting:

1. Plan your route the night before. Gather your addresses and plan out a smooth route. MapQuest has an awesome route planner that will sort and organize all addresses you input into the system. That way you’re ready to go in the morning with no chance of running back and forth all over town.

2. Bring plenty of cash. This is pretty obvious. You can’t use your card and most people are pretty weary of personal checks. Cash is the boss. Take lots of ones and other smaller bills. Put your cash in separate wads- one for furniture (little higher in amount), one for clothes, and one for knacks. Helps you keep organized.

3. ALWAYS negotiate. If anything you want is over $10, try to reason with the price. The best way to do so is to pull out the amount you’re willing to pay, present the cold hard cash right then and there, and let them decide if they’ll accept. You can always add a dollar or two more, but starting low is the best bet that you’ll get the best deal. One of my moms favorite things to do was grab a lot of stuff and offer one flat price for it. Worked every time.

4. Check the items. Make sure buttons aren’t missing, zippers zip, and pieces are complete. Do a quick once over to assure that any item, from board games to t-shirts, are in the condition you want them to be in.

5. Dig! Don’t be scared or shy. That’s one thing my mom taught me. Boxes, bags, crates, etc, they’re all filled with the things the person WANTS to sell. You never know what hidden treasure you might pass up by not looking through things.

Yard Sale Northern California May 2005. This i...

Yard Sale Northern California May 2005. This image is in the public domain. (Photo credit: Wikipedia)

6. Tip: YARD SALES HAPPEN RAIN OR SHINE. You might score some sweet deals by venturing out in less than desirable weather. My mom once bought a sofa worth at least $200 for $40 once because of bad weather.

7. Go early, stay late: The best deals happen first thing in the AM and just before things are put away for the night. In the morning, you’re there early and they’re ready to unload. In the afternoon, go back to any ones you left desired items at hours before and see if they are still there. If they are, you’re probably going to score a sweet deal, as many folks just want to get rid of stuff and pack up.

8. Interact: This was my moms key to successful yard sailing. She made friends with the other shoppers and the yard sale host. Chatted about items, families, and the weather. It helped her drive harder bargains, make new friends, and ultimately spice up the experience. Yard Sales are not dog-eat-dog environments. Its a fun way to spend the morning and use the recycle system. So make it fun!

9. Pack snacks. You don’t want to waste precious time stopping for food. Bring a batch of fruit, nuts, and bars to help you stay energized during the peak yard sale hours.

10. Dress modestly. Again, it helps with the bargain negotiations that you’re not wearing super expensive clothes. It may be a harsh point, but its one I’ve seen make a difference.

These tips will hopefully help you not only find better deals, but make going to yard sales something you look forward to not just for the things, but for the overall experience. Happy sailing!

Enhanced by Zemanta

Got a bird that just left the nest? College time is always difficult for parents. Riddled with worry, excitement and a little bit of sorrow, seeing your “kids” off to their newest venture in life definitely tugs at your emotions.

The golden question tends to be:

“Are they prepared?”

Well you can help them with that.

Apartment Therapy posted an awesome list of 8 essential things to buy your youngsters breaking out into the world that all come in under $40 per piece.

Everything from shower curtains to the easily forgettable shower/bathroom cleaner. Check them out and rest at ease, parents.

Of course, we recommend a great shower head as well!

Tell your kids to shop at places like Target, IKEA, and Bed, Bath & Beyond to get quality but affordable products. You don’t want to break the bank, but you also don’t want to leave them with items that become useless in the matter of months.

Also consider asking grandma, auntie, or big brother to purchase things like hand soap, toothpaste, and toilet paper as little gifts to help the first stocking of supplies.

Now go study!

Enhanced by Zemanta

*originally posted on Inspiring Pretty

Every girl wants to be pretty, but it can be difficult using tons of masks, lotions and just a load of products. It can break your bank and expose you to unnecessary amounts of chemicals. I believe in keeping it simple and cheap. No need to go shopping at Macy’s, Bare Minerals or any of other stores. Just head to the grocery store with a $20 bill to get the same effect. I’ve compiled a few beauty recipes below, but there are a plethora more that are just a search engine click away. (Be sure to check out more beauty recipes here as well coffee beauty and beer beauty recipes, too!)

1.) Brown Sugar and Honey Facial Scrub
This is probably my favorite one. Brown sugar exfoliates the skin ridding the pores of all dirt, oil and dead skin cells causing blemishes. Honey is naturally antibacterial, so as the brown sugar scrubs away the things clogging pores, the honey cleans out the sources of the buildup to prevent future breakouts.

2.) Coffee Grounds in Conditioner
This one is really simple. Instead of throwing old coffee grounds away, toss them into your conditioner to make your hair extra shiny. That’s all it takes!

3.) Replace Conditioner with Vinegar
To get rid of the usual problems with hair: build up, dullness and just lackluster, replace your conditioner with vinegar 1-4 times a month, depending on your hair type. Just use it as you need it. And, don’t worry about buying the best stuff for the best results, common white vinegar will do the trick as well as any other vinegar.

4.) Olive Oil as Hair Moisturizer
It’s easy to see how oil can moisturize your hair. It’s simple to use as well. Simply cover your hair in olive oil and leave it in for 30-45 minutes. You can also wrap it in plastic wrap to keep it from dripping. Some also believe it enhances the effect.

5.) Lemon and Egg Facial
Have red splotchiness on your face? Soothe both symptoms away easily by mixing together one egg yolk and the juice of one lemon into a paste. Cover your face with it and leave it on overnight. If this seems like too much work, leave it on your face for an hour. You might not get the optimal results with this amount of time, but you will see a difference.

6.) Replace Conditioner with Baking Soda
Want to be more like a guy and only use one thing to clean your hair? Then just add baking soda to your shampoo. It will remove build up and make hair shinier. And to make it even better, you can use it everyday (if you have normal hair).

7.) Degrease Oily Hair With Lemons and Aloe
Mix together 1 tablespoon of lemon juice and 1/2 teaspoon aloe vera. Mix the mixture in with a normal serving of shampoo. It will get rid of your oiliness in your hair with one shower.

8.) Smooth Fizzy Hair With Honey
Add a tablespoon of honey to a liter of water. After shampooing, rinse your hair with this concoction to tame your frizz.

9.) Replace Face Wash With Skim Milk Powder
Switching face wash out with skim milk powder can make your face much softer and give you a smoother complexion. It’s also very gentle, so even the most sensitive can use it.

10.) Moisturize Skin With Honey and Olive Oil
Honey holds moisture extremely well and olive oil hydrates well, too. Mix equal parts of olive oil and honey (and add a dash of lemon juice if you’d like) to create a pasty lotion. Rub it onto the dry skin and let it sit for 10-20 minutes. Your skin will be hydrated for plenty of time to come afterwards.

11.) Soften Skin With Oatmeal
There are many concoctions and mask recipes that involve oatmeal, but you can use oatmeal by itself to help your skin. Ground up about 1 cup of oatmeal using a blender or coffee grinder, and add it to bath water to soften skin to baby-like quality.

12.) Treat Chlorine-Damaged Hair
Mix together 1 egg, 2 tablespoons of olive oil and 1/4 cup of a peeled cucumber. Cover you hair with the mixture and leave it on for 10-20 minutes. You’ll see your hair return to normal almost immediately.

13.) Tone and Rebuild Skin With Avocados and Carrots
This recipe can work wonders. Combine 1 avocado, 1 cooked carrot, 1/2 cup heavy cream, 1 egg and 3 tablespoons of honey. Leave on for 10-20 minutes and then rinse. These ingredients add a multitude of vitamins, antioxidants and calcium to rebuild natural collagen, tone skin and remove age spots. There is plenty to read about the benefits of each of these ingredients, but all you need to know is that each natural element does more than any store-bought item can.

14.) Lemons or Oranges for Fine Hair Hairspray
Use Lemons for dry hair and oranges for a stronger hold. Chop up the entire piece of fruit in a bowl as to not lose any juice. Boil the fruit with 2 cups of water until soupy or to when the liquid has been significantly reduced. Strain through a cloth and pour into a spray bottle for use. The citrus will hold the hair and not damage it due to the fact that there is no alcohol.

15.) Apple Cider Vinegar for Cleanser and Toner
This eliminates dead skin cells easily, so you can use in lieu of expensive toner. That’s all there is to it!

Being beautiful can get expensive and damaging if you’re using products often. Try using these natural tips before spending money and see if you even want to try products after. Check out out post on how to treat acne naturally, too!

Reblogged from Apartment Therapy:

Seeing that long holiday weekends always give us some extra time to fiddle about and create creations, we found a super awesome post on Apartment Therapy that features 30 various projects ranging in price that you can DIY during the weekend.

We know you’re not supposed to the laboring, but we figure that for cool projects like this, exceptions can be made. Check ’em out!

30 DIY Projects for the 3-Day Weekend

Some of the projects include:

1. Make a grill for your budding Top Chef – How To Make a Toy Grill for $20
2. Make a place to stash your pens and pencils – DIY No-Sew Colored Pencil Roll
3. Clean your bedroom – The Ultimate Guide to Green Cleaning Your Bedroom
4. Make your kid fly – How to Make Your Baby Fly
5. Create a charging station – An Upcycled Plastic Bottle Charging Station


And more!

…they even include a shower head switch out. Something we’re a fan of.


Have a wonderful 3 day weekend!

http://www.apartmenttherapy.com/30-diys-for-the-3-day-weekend-171742?utm_campaign=topblock&utm_medium=web&utm_source=main-entry

Enhanced by Zemanta

We all need a good cleaning from time to time. Usually the start of Spring/Summer is when we get to it, but with busy lives, hectic work schedules, and so many better things to get out and do during those times, you don’t realize how piled you are in excess things until it’s absolutely time to purge!

We’re all about managing junk and cleaning out the garage- but without taking everything and unloading it into the dump.

Typical advertising mail

Typical advertising mail (Photo credit: Wikipedia)

So simplify your life and use tech to get it done! Here are some apps and sites that allow you to dump the junk:

1. PaperKarma: Apparently, this is the app to end the age old junk problem- junk mail. PaperKarma allows you to take photos of the junk mail you wish to stop and they automatically contact the Mailer and remove you from their distribution list.

Sign us up!

2. Diggerslist.com: This site is cool! Dubbed as the Craigslist for DIY, Diggerlist has a rapidly expanding site that allows you post home improvement items and furniture that you don’t want. Post, sell, SOLD! Everything from heavy equipment to kitchen appliances can be found here, and its all listed by city/area.

And they have a killer blog filled with decorative ideas and home projects. It’s so sweet it gives us a toothache.

3.  Freecycle: This is an app that claims to be totally grassroots and an entirely nonprofit movement of people who are giving (and getting) stuff for free in their own towns. With 9 million members worldwide, its hard to imagine that there aren’t many treasure as junk items to discover!

4. Unroll.me: FINALLY. Those pesky email chain letters that you subscribed to eons ago just to get a 15% off coupon are taken care of. Unroll.me is the free and easy way to end unwanted subscriptions and “rollup” the rest into an organized overview made just for you.

Organize the newsletters and make them actually interesting and easy for you to indulge in!

 
So there you have it. Get the junk out of everywhere- well, except the trunk.

Enhanced by Zemanta